home brew

You are currently browsing articles tagged home brew.

I felt as if my hops weren’t getting saturated enough in bags. When I tried the no bag approach I either had stuck filters or a lot of hop matter in the fermenter. So after a bit of research, I made a hop spider primarily based on the thread at homebrewtalk.com.

It was about the easiest DIY brew project to do and cheap too. Its been great handling the trub and I no longer have to worry about cleaning out several muslin sacks. I highly recommend this approach if you are having similar issues.

Tags: , ,

Beer Name: Persuasion Saison

Style:  Single Hop Saison (Funkwerks Nelson Sauvin Clone)

Brew Day: 8/6/2016

Alcohol: 8.2%

Color: 4

Super good beer.  Kind of a mix of a sauvin blanc and a saison beer.

My Brew Notes

Execution Notes

I had a lot of fun making this and filling in the blanks.  I ended up using a repitch of Belgian Saison and a starter of French Saison for my yeast.  I ended up overshooting my mash efficiency and ended up with 15G rather than my planned 13.2G (calculated batch size for one can of Muscat grape juice)  to keep the OG about where I guessed Funkwerks might start with (~1.063 w 90% attenuation).  I think my lack of quick cooling and less hops per gallon of wort contributed to my beer not being as aromatic (still plenty good and something to aim for next time).  To add to things mine attenuated better than I planned (1.004) and end up being an 8.2% beer.  Finally, since this was a Saison with a good amount of wheat it didn’t occur to me that Funkwerks was filtered in some way until we did a side-by-side comparison.   So in the end Funkwerks looks better, smells better, and taste a bit more crisp than mine, but boy are both still good.

Recipe Info

Recommendations for next time

  • Add hops a bit later to help shine
  • Cold crash and add gelatin


Research

Funkwerks Nelson Sauvin Info

  • ABV=7.5%
  • FG=1.006 (estimated)
  • OG = 1.063 (estimated)

Funkwerks Head Brewer Email

Here are some quick tips for cloning Nelson Sauvin. We use very light Pilsner malt, Best Malz Heidelberg or Briess Pils. 20% is light Wheat malt and 12% of fermentables is Muscat grape added at flameout. 0.5oz/5gal Nelson at 10 minutes, 1oz/5gal Nelson at flameout. There is no bittering addition. Ferment with favorite Saison strain.

Let me know how it turns out.

Gordon Schuck

Yeast:

  • For the yeast nerds out there, the Funkwerks house yeast strain comes from Wyeast’s 3711 French Saison varietal*.

Funkwerks Brewery | Nelson Sauvin Saison

Brew Day

  • Mash at 148 to help with attenuation
  • Muscat Grape Sugar Calculation
    • 68 brix /(1 g of water = 8.33lbs) = 8.16 brix per lb

Fermentation Schedule

  • Likely Funkwerks profile is familiar to tropic king: pitch at 65, ramp up to 75 over 48 hours.
  • Maltos Faclons recommendation:
    • Place the wort in a temperature controlled environment at 65F (18.3C) for 3 days before letting ramp (or if you’re like me and don’t have enough space for temp controlling everything – I’ll place the fermenter in an iced water bath and let the heat of the day and the ferment melt the ice and raise the temperature to mid 80’s and 90’s (29-35C). It’s perfectly safe to drive a Saison yeast this hard if you’ve started cooler.
    • https://www.maltosefalcons.com/tech/guide-saisons-and-saison-yeasts
  • Only place foil over top (i.e. no airlock) per link below to help attenuation

Under Pressure – Pt. 4: Airlock vs. Foil With Saison Dupont Yeast | exBEERiment Results!


Serving

  • Serve at 50°F (10°C) in a tulip glass.”

Tags: , , , ,

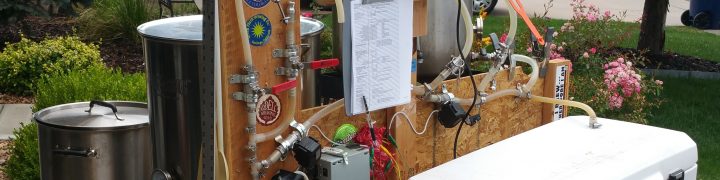
Here is a photo of my nearly complete brewstand.  To finish I still need to clean up the electrical wiring (and to think I’m licensed in something like this),  build my circuit board, build the HERMs pot, program an Ardunio and paired Android app.  Besides that I can do large batches 15+ gallons of infusion mashing  brewing.  More photos at the end.

20160515_161756

First Edition

When we lived in CA I  was able to get some brewing equipment off of Craigslist that would let me do at least 15G batchs.  The problem with that is that I didn’t think it to be a good idea to lift 10+ gallons of boiling water above my head to pour into the mash tun.

Since I had everything in the garage which was incredibly over packed the initial stand had to be very compact.  I knew the pump wasn’t self priming and came up with an idea to solve that…suction start.  I tried a few concepts before I figured out how to make things work the way I intended it too.  Here is a photo of that stand for batch #12.

Second Edition

With a pump in hand I started day dreaming of a better brewing setup.   I spun up some ideas for a single pump HERMS system and created some basic Visio drawings to help make sense of it.     I posted my ideas on homebrewtalk, but didn’t catch the attention of anyone.  By this time we had moved to CO and I continued to press on with my idea.  In a panic to make my back-to-back brew days while Lisa and the kids were out of town I slapped together my concept.  Needless to say the brews day didn’t go well.  Switches didn’t work, power supply died, liquid wouldn’t transfer through the tubing, and all sorts of other things.
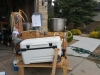
Third Edition

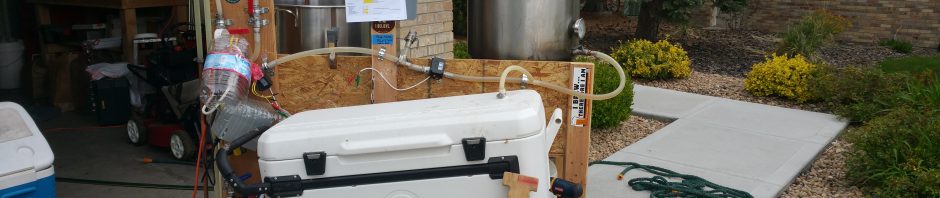
I learned a lot on the failed brew session and went back to the drawing boards.  With more space to work in CO I dreamed up a real brewstand.  A 2 tier, all wood,  and pretty simple to assemble brewstand.  I use some grid paper to get my the concept put together and then used Google SketchUp to complete the design.  One theory for my failed liquid transfers was too much back pressure and suction on the tubing.  So I simplified the tubing and added in a gant before the pump.  I got one brew day on this setup for batch #16.  The day went well, but I figured out a few more tweaks to make.  I then had a 3 day brewing marathon to make 40G in 4 beers.  The brew day was success and I’m quite pleased with my brewstand.

Next update for the brew stand I hope to have the HERMs system up and running with a decent looking control panel and Android app.


Tags: , , , , , ,

Beer Name: The Student

Style:  Pliny the Elder Clone (Double IPA)

Brew Day: 12/24/2014

Alcohol: 8.28%

Color: 5

I am super happy with how this beer came out as it is one of the best beers I’ve made, but it isn’t exactly like Pliny the Elder. I had some process issues that probably altered the beer a bit, but I the recipe wasn’t quite right either. It turns out that a copy of the RRB brew house recipe was posted after I made my beer and did the taste comparisons. Here are my thoughts from my comparison before reading the real recipe.
Color – mine was a bit darker
Taste – level of bitterness and maltiness seemed about right. Mine seemed a bit too citrus, I think maybe too much Amarillo.
Aroma – my certainly didn’t have that dank smell. Not enough Simcoe (either in amounts or utilization)

My Brew Notes

Execution Notes

I’ve always used RO water as I didn’t know what was in my home water for a long time.  When I finally figured out my water I learned that it comes from two sources which are pretty much on the opposite side of the spectrum and there is no way to know what is coming out when.  So I’ve continued to use RO water which is cheap at the filling station next to the grocery store (30 cents per gallon).  This was the first time I tried doing water adjustments from the RO water.  I bought some things last minute, but didn’t have anything to make Chloride adjustments.  I’ll work to get better at this, but was focused on doing too little rather than too much.

Had similar issue with the mashing again where I started hotter than planned and then dropped about 8 degrees over the coarse of the mash.  My numbers came out okay, so nothing to worry about on this batch but certainly something to work on.

I tried using a little pump from ebay to do a whirlpool (not a real whirlpool, but enough to keep the wort moving over the coils when chilling), but clearly wasn’t ready as I fussed with that for about 20-30 mins before giving up and just using a spoon to stir.

Other minor notes.  My measurements don’t seem to be too accurate as I gained wort from the post boil measurement to the fermenter.  Need to get better at that.  I allowed for 30 mins for the trub to settle and then used my filters for the post boil transfer which resulted in a very low sediment in the fermenter. I collected the yeast into a clean spagetti jar as practice for yeast washing.  The yeast came out really clean and if I do things right (sterile jar and water) it seems I can start re-using yeast in the future.

Recipe Info

  • My Recipe: Brewtoad
  • Recipe Source: see my research post
  • Schedule Link: #11


Recommendations for next time

  • Mine ended up not being as piney as PTE.
  • Work on limiting oxygen during transfers to make the beer last longer
  • convert this recipe

Tags: , , , , ,

This post is long overdue, but here is a quick recap of my AC replacement.

About a year ago the window AC unit in the fermentation chamber went out when I was making batch +8.  I’m pretty sure this is the reason that batch ended in bottle bombs.  I wasn’t too disappointed in the AC failing because I felt that it was working more than it should.  It appeared to let a lot of cool air out of the unit itself causing it to kick on more than I thought it should.  So I decided I’d reuse the guts of a small cube fridge.  In hindsight, I wish I had used a bit larger of a cooler as it appears that I can only hold a 35 degree temperature difference.  This is sufficient for fermenting, but not good enough to get a good cold crash when the garage is in the 80s.

Taking apart the mini-fridge was pretty easy once I bought a pair of sheet metal scissors.  From there it was pretty easy to mount the cooling tray and add the insulation.  I certainly didn’t sand and paint as good as I did in the original build, but it works.  Finally, I added a pc fan to continually blow across the cooling tray; without it I noticed that it would ice up when trying to cool.  I’m seeing a bit more condensation that I expected and have a towel to catch things.  I’m trying to limit the amount of times I open and close the fridge for now, but this is something I’ll have to keep an eye on.  All in all, it works and I’m back to brewing!


Tags: , , ,

« Older entries § Newer entries »