Tech Talk & Other Thoughts

Some nerd talk by Brian and other random thoughts

This weekend I updated my Spring HTC Evo Shift to Gingerbread (Android 2.3).  There was a pushed update by Sprint, but since I had rooted my phone it wouldn’t take.  Lisa has the same phone, but not rooted and the update went just fine.  So I resorted the internet to figure out what to do.  I found this link which listed and went to the “ROOTED “Official Update” – x99_GB_Sense_Stock_Rooted” which linked to the ROM download.  I tried downloading this on my phone, but the download site 4shared.com keeps restarting the counter.  So I downloaded this on my PC and placed it into the root directory.  Before I implemented the root I looked into how to best back up my phone before proceeding.    There was a good post on the same forum with the ROM that mentioned to use the following 3 programs:

I did a backup of the call logs, SMS, and then Apps (in that order).  The I went to bootloader and did the following:

  • wipe data / factory reset
  • install ROM

Everything loaded up fine and I started the recovery process.  First I had to enter in my google account info and then downloaded the Titanium Backup App.  Did the batch restore.  This worked out pretty well.  It was kind of annoying to choose to reinstall everything, but at least it worked for the most part.  Some of the apps didn’t ask to reinstall, not too sure why, but I looked in my downloaded app in Google Market and just manually selected to re-download them.

At one point I got an error that my phone was full at which point I realized that all the apps were installing to the phone and not the SD card.  Before the update I had changed the settings in my phone to default to installing them on the SD card , obviously the new ROM didn’t have this.  This link shows what to do for Android 2.2 and I suspect that it works for 2.3, but haven’t tried.  I found that Titanium Backup had an option to move all apps to the SD card.  I did this and then moved a few that I use frequently back to the phone.

Well everything to restore pretty well.  A few apps asked for login information again, but after that retained their setting.  Some kept crashing, Google Maps and Facebook, but after going into the Manage Applications menu and clearing the Apps cache they worked fine. Next, I ran the restore function for both the SMS and call log apps.  Presto their back.

The next problem that I found is that the weather & toggle widget that I use to emulate the HTC Sense clock wasn’t available to add as a widget.  It was installed, so I uninstalled it, then re-installed it.  Another Google search turned up that in Android 2.3 widgets can only be selected for apps installed on the phone, not on the SD card.  So a quick move to the phone and my phone is back exactly the way it was before (except for 2.3 of course).

All in all, a pretty painless process.  It took a bit longer than I imaged, but I’m happy that with only a couple of hicups my phone looks just as it was before the update.

The main thing I noticed from about 2.3 is how fast it turns on and off.  Actually, I noticed this from Lisa’s phone when we were in Italy and was somewhat jealous.  Other than that I haven’t seen or had a chance to see if the battery life is the better as claimed by Google.

Tags: , , , , ,

I’ve given our website a new look.  I didn’t care too much for how the posts where categorized and the main header.  Also, once Lisa and I really do start blogging about our lives, so that we can keep in touch with our family and provide a little journal for us, I wanted that to be able for to get to it easily. After looking around I’ve discovered that you can create custom menus, but the current theme has to support it.  The old theme, magic blue, didn’t support custom menus so I found a new one that I think is okay.  Maybe not my favorite, but it looks pretty clean and simple to maintain.

Tags:

Here is a little write up of my latest engi-nerd episode.  Well my 2004 Nissan Murano car remote decided to stop working a few months ago.  It was in my soccer back while it was raining (the same day of the LA marathon) and it seems to have gotten wet.  Well I broke down and bought a new one from the dealer.  I should have done my homework and bought one online as you can find them 60% than the Nissan deal.  What a scam!  So now that I have a good remote I’m determined to fix my old one.  I figure I’m an EE, I should be able to fix this.


So first thing get my BK Precision 2707A digital multimeter (DMM) and some things out of the garage.  I come inside sit down to get going and the DMM won’t turn on.  Ah, dead battery right?  To change the battery you have to unscrew the back off.  So I get a screw driver and replace the battery…nothing.   I take it out and put it back in make sure that there is a good connection and again nothing.  Next, I put it on the Connective Mode where is gives off an annoying sound if the two leads touch.  Schreeze!!!! Well that’s interesting it appears to be on, but the screen doesn’t work.   I love how all projects have scope creep.  Well I fidget around with this and do some online searching to see if there are any similar issues. No luck.   I found out that the version of my DMM has been discontinued and the company will give me a $30 discount on a new one if I turn mine in.  I figure I might as well tear into this to see if I can figure out what is wrong before I bite the bullet and guy a new one.  It unscrews pretty easily and is a pretty simple board.   The interesting thing is the screen isn’t soldered onto the board.  It has this funny silicon-metallic stand that the screen fits on.  A plastic cover snaps on to the PWB and holds the screen and stand in place.  After sliding this stand around I can see the screen display characters which means the problem is likely the stand to PWB connection was just off (I may have dropped the DMM a while back).  So I snapped the screen cover on and using a small screw driver adjusted the silicon stand in place.  Wa La! the screen works.

Now back to the real project.  I did a quick check to ensure the battery is connected to PWB and nothing.  Interestingly, the buttons don’t pass a connectivity check when I put the probes directly on it.  So I then placed the PWB into the good remote to make sure that it wasn’t the little buttons.  nothing.  (not really sure how the little buttons work at this point, but I’ll try to stay focused).  Now that the first couple of easy ideas have failed I think I’m onto more work.  I’m going to take a picture of the PWB and mark all the connections and then check to see if it matches the good remote.   I’ll report back with an update after that is done.

Final Update:

Well I went through probing the PWB and drawing out all the connection points. Which actually didn’t take too long.

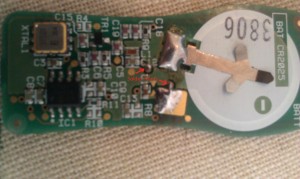
After going through it I realized that the Vcc (power) didn’t connect to the switches any longer.  The two red circles should be connected, but they weren’t.  The little holes are there to connect the traces on this side of the PWB to the other side.    For some reason the connection from one side to the other wasn’t working.  So that is an easy fix.  I turned on my soldering iron and place two wires through the holes then soldered each side to the PWB.  My soldering job is actually a pretty horrible job and think the tip on my soldering iron may need to be replaced.  I think I’ll save that project for another time.

After I soldered in each wire I checked the connectivity again and it all seemed to check out.  I then went out to my car and reprogrammed the car following these directions (found on this forum):

1. Close and lock all doors with the driver’s side power lock/unlock switch.

2. Insert key into ignition and remove it from the ignition key cylinder at least six times (or more) within 10 seconds. Your Hazard Lamps will flash if you have performed this step successfully.

NOTE: Withdraw the key completely from ignition cylinder each time. If this procedure is performed too fast, system will not enter programming mode.

3. Insert key into the ignition cylinder and turn to the ACC position.

4. Within 5 seconds, push ANY button on the remote transmitter. Your Hazard Lamps should flash.

NOTE: Do not press the button more than one time in this step. If the button is pressed more than one time, the programming procedure will not be successful.

5. If there are any remaining transmitters (including existing ones), unlock then lock all doors using the driver’s side power lock/unlock switch and within 5 seconds, push ANY button on the next remote.

Your Hazard Lamps should flash.

Repeat this step for each transmitter (including all existing transmitters).

6. Turn the key to the OFF position, remove keys from the ignition, unlock doors using the driver’s side power lock/unlock switch and open the driver side door.


At Step #4, the lights flashed and right away I knew I had fixed my remote!  I didn’t have my new remote with me so I went and got that one, followed the programming instructions again, and then confirmed both are working.  I think I’ll use the new car remote for now and keep the one I fixed as a back up since I don’t feel too confident about my soldering job.

Project Complete!


I’ve finally gotten the website back up.  There have a been a few changes that made it somewhat hard to bring it back.  Below is a brief summary of what I did.   I took  a ton of Google searches and forum reading to get here.  I plan to describe things in more detail  at some point to help others like me.

First, my pc died.  Then I had to convience Dell to send me a brand spanking new Alienware m17X almost fully loaded.  Next, I swapped out the one deficiency in my new m17X the RAM.  It came with 4GB  (2x2GB), but I’ve upgraded to 8Gb (2 x 4GB) and fixed the BIOS to run it at the full clock rate.  I also bumped up the processor clock speed to 100% since the default was 85% or 90%.  That got my computer up and going again.

Next, I got a new Belkin PlayHD 800 router.  Its got dual 2.4GHz and 5GHz radios from which my new laptop can take advantage of.  However, the firmware absolutely sucks and couldn’t host my website through it.  So I loaded a version of dd-wrt into it.  It took some more time to get the two USB drives up and going, but now our home network seems to be working great.

Finally, I reinstalled all of the tools needed for the webpage (Apache, PHP, MySQL) and a few extras (uVNC, WinSSHD, Filezilla FTPS, and the ps3 media server).  Now presto, I am writing this post 🙂


Tags:

I just completed my first update to WordPress and it was painless!

Tags:

« Older entries § Newer entries »