Beer 8 – Black Rye IPA

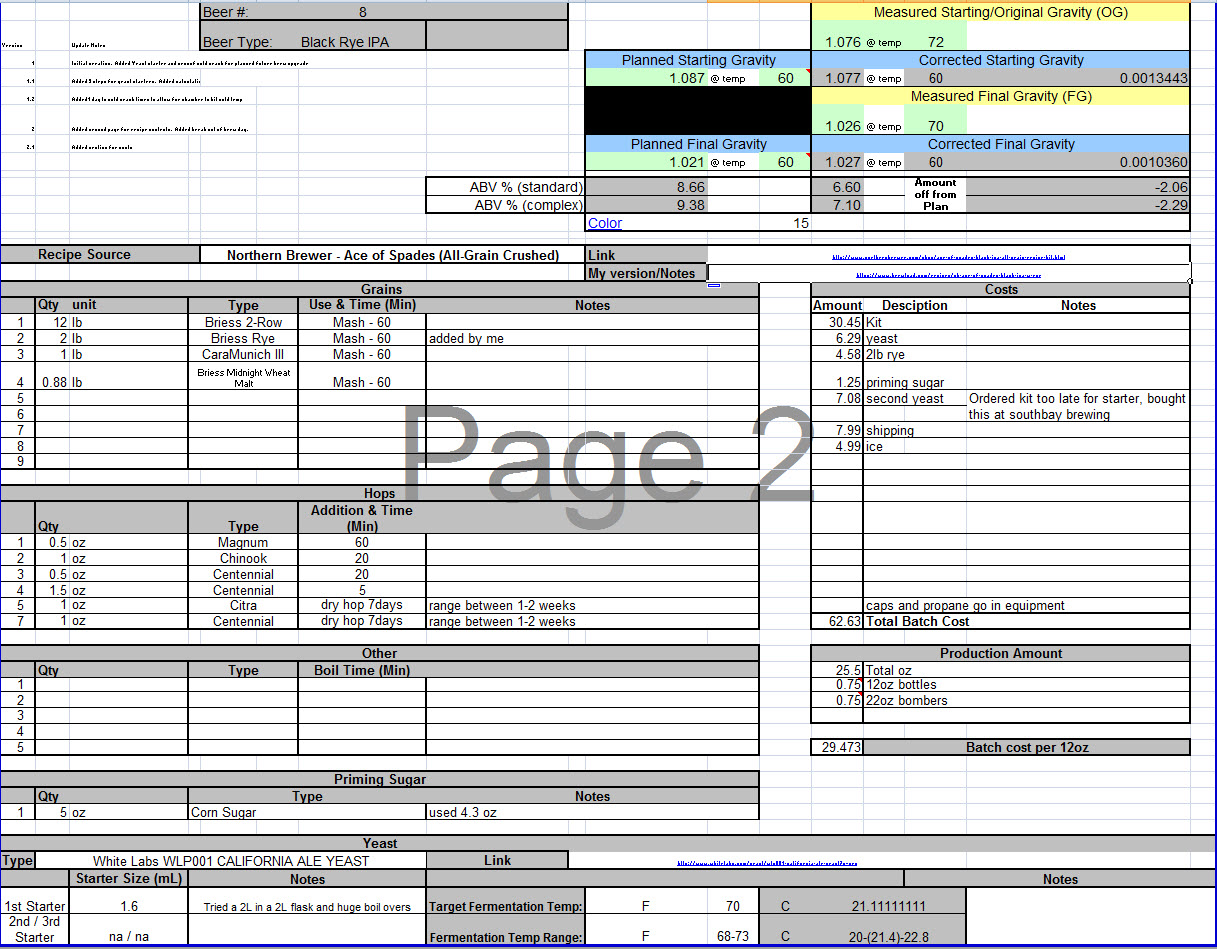
  • Beer Name: Burnin’ Spades RIPA
  • Style:  Black, Rye, IPA
  • Alcohol: 7.1%
  • Color: unknown

My first venture into all grain brewing has literally blown up in front of me.  So who know how it tastes, but here is what happened.   After coming home from vacation I saw liquid coming from the fermentation chamber.  When I opened the doors about 6 bottle or so had exploded at the bottom.  So I took everything out and cleaned things up, exactly what you want to do after a long travel day.  Just as I was putting the beers back in the fridge, the bottom of a six pack broke open and the bottles dropped maybe a foot.  Well all 6 of those bottles exploded.  Sounded like a bomb went off.  I was lucky no glass hit my face, but my legs and feet were not so lucky and had blood streaming down.  Now I had another mess to clean up.  So while I was cleaning that up 2 more bottles exploded just sitting on the sidewalk.  Awesome, I have bottle bombs.  Not wanting to loose everything. I place the remaining beer bottles in a cooler and inside my fridge.  That night I heads several more explode…sounded like a gun shot.  Hoping to save the beers, I planned to pop the tops on the remaining bottles and then re-cap them.  I put on my bomb squad gear (an old paintball face mask, a thick long sleeve, and some gloves) and reached into the cooler to take the tops off.  The first one gushed everywhere, same with the second, third and so on.  After a bit there was so much foam I was just feeling through the cooler to find unopened bottles.  Well needless to say this was a total loss.  I did try about half a glass full just to see what it was like and it was sweet almost like the raw wort.

So here is what I think happened.  During my last batch of beer my fridge died, so I didn’t really have good fermentation control while this beer was fermenting.  We had really hot days and warm nights.  I think the yeast shutdown due to the high temperatures.  I should have noticed that my final gravity reading was high and done something, but just moved right into bottling.  After I bottled I also replaced the AC unit with a min-fridge coils and was able to set the temp.  I think when I did this the yeast woke up again and started chomping on all the unprocessed sugars, thus creating my bottle bombs.

On the fun side, I got some 3/4″ stickers to make cap labels for my beers.  I got lucky and made labels for my previous beers as I had to move my bottles all around while cleaning.  Making a label is now part of my beer making process.

My Brew Notes

Recipe Info

 Recipe Notes

Execution Notes

Tried making a 2L starter in a 2L flask.  Resulted in a boil over.  Separated into two flask for the boil then recombined when they cooled.  Ended up with 1.6L of the 2L.

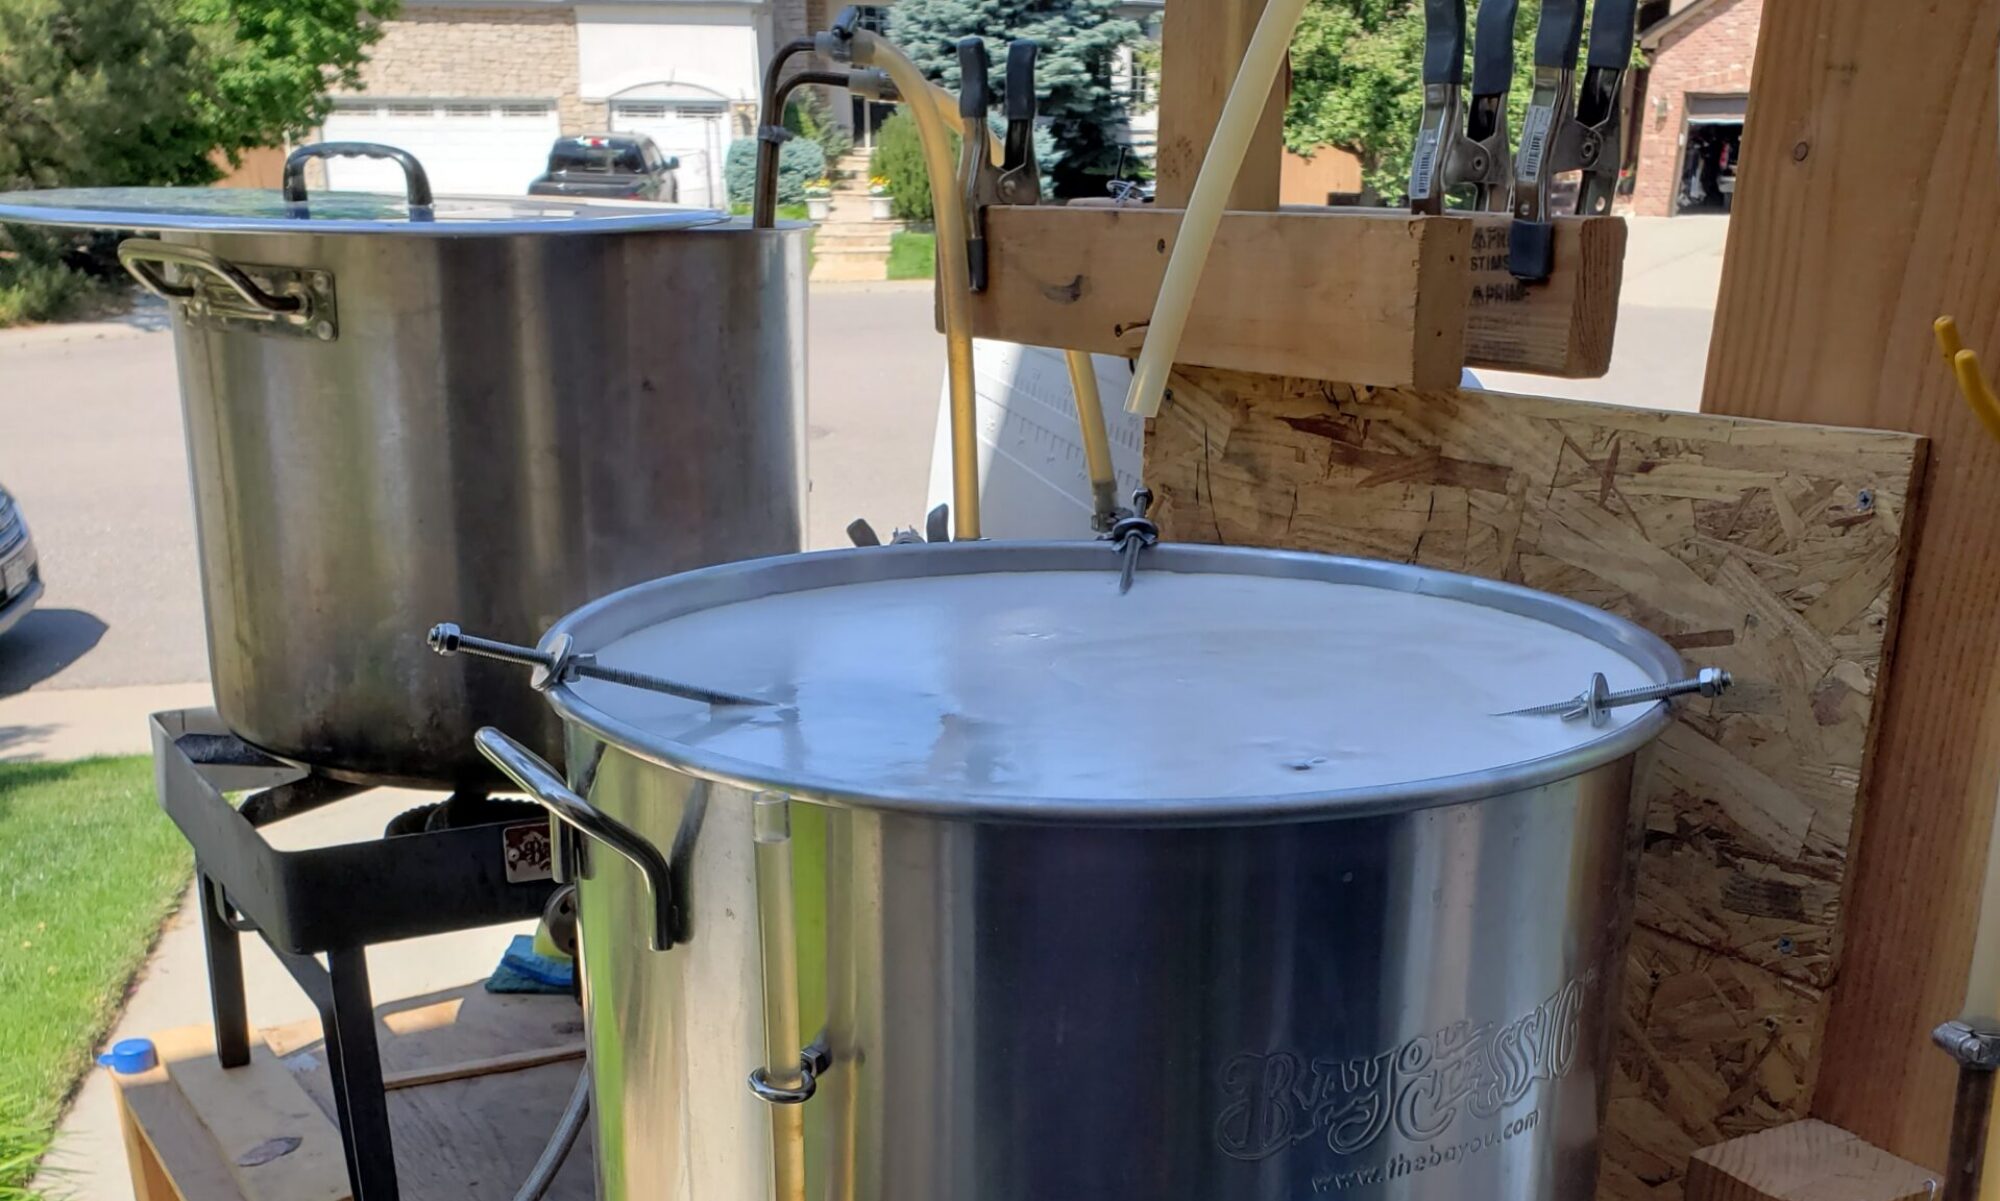
First time making all grain batch.  MLT filter was too small and got a stuck sparge.  I knew what my number were supposed to be, but wasn’t prepared to be able to measure if I was hitting them or not (ie. depth to volume conversions). Messed around switching in a different filter which caused the temps to go wild.  Through all the hops directly in which wasn’t so bad.  What was bad way the bag I had to catch the gunk at the output end of the hose when transferring to the primary got clogged up and ended up not using it which passed a lot of material in the fermenter.  When transferring to bottling bucket the the filter around the tube also was causing problems so a lot of material ended up in bottles.  Need to do this better next time

Schedule

  • Brew day: 6/13/2014
  • Cold Crash Start: N/A (Broken fermentation chamber)
  • Secondary Fermentation: 7/2/2014
  • Dry Hopping: 7/29/2014
  • Cold Crash 2: N/A
  • Gelatin: N/A
  • Bottling Prep: 8/4/2014
  • Bottling: 8/5/2014

Recommendations for next time

  • Get the filtering down much better
  • Make sure the fermentation chamber is working
  • Know numbers better and know how to take measurements

Trub impacts to volume measurements and calculations

homebrewtalk.com forum

I’ve been working to understand my various volume measurements throughout brew day and wonder how Trub and other material is handled. For instance, from my batch sparging I have an idea how much grain absorption and MLT losses to expect, but I know when I do a pre-boil volume measurement there is a fair amount of material in there that is going to add to the measurement.

Also, when doing a, lets say, 5g recipe I assume the is the amount of wort into the fermenter. Is this correct? I know that the amount of trub carried into the fermenter various by beer and beer maker so how does one account for the variations?

Trub impacts to volume measurements and calculations

Priming Suggestion

homebrewtalk.com forum

Currently I gravity feed my immersion chiller. I’ve used a pump in the past, but from what I’ve discovered it isn’t the rate of water that is effecting the rate at which i can chill the beer (gravity is just fine) it is the amount of wort that comes in contact with the beer. So to help things along I’ve been stirring with a spoon. I’m working on adding a pump into my brewing setup to make life easier on me, but I’m not too sure how to go about priming the pump. I plan to have a simple inlet and outlet pipes with 90 bends to push the water around and through the coils of the chiller. I’m not going for a whirlpool affect, at least for now, with my wimpy pump but am just trying to move the wort around the coils without me stirring. For the record i have a valve on my kettle, but I don’t want to use that as I have a filter around it that I want to keep clear until I transfer to the primary. . Anybody have any suggestions of how to go about priming my setup? I know adding another valve would solve my problem, but I’m looking for other ideas as I’m not too keen on this idea as I want this idea to work with several other kettles. Thanks.

Priming Suggestion

Chugger Pump Head – PP vs SS

homebrewtalk.com forum

I’ve been looking around for differences between the plastic and stainless heads on the chugger pumps. Of course most people say go with the stainless, but I’ve yet to see any rational for it other than fear that the plastic might break (haven’t seen anyone actually report one breaking).

I’m looking to hear from those that have plastic heads or have converted from plastic to stainless what their experiences are.

Chugger Pump Head – PP vs SS

Double gelatin – primary and secondary

homebrewtalk.com forum

I’ve used gelatin in a secondary and have been able to bottle condition just fine. I’m working on making a Kolsch and want to see how clear I can get this to be. Any experiences or thoughts on cold crashing and using gelatin in the primary and repeating it again the same steps later in the secondary?

Double gelatin – primary and secondary

Beer 7 – Belgian Witbier

Beer Name: Whenever Wit

Style:  Belgian Witbier

Alcohol: 4.31%

Color: 15

Recipe Source:  Midwest Belgian Witbier

This came out to be a pretty nice beer.  I didn’t do anything fancy (no secondary, no fining agents) and was pretty happy with the result.  I added a bit of fresh orange peel to give it a bit more zest though I’m not sure how much it added over the dried peel that came with the kit.  It has a nice hazy color and is well carbonated (if not too much).  If I were to do this again I’d reduce the coriander a bit as it is a bit strong for my tastes, but not so much that it ruins the beer.

My Brew Notes

Ingredients

  • 6 lbs wheat LME
  • 8 oz Carapils (30 min steep)
  • 1 oz Liberty hops (60 min)
  • 1 oz bitter orange peel (10 min)
  • 1 oz coriander (10 min)
  • 1oz sweet orange peel (10 min) added by me
  • 1 oz Hallertau (2 min)
  • Yeast: White Labs WLP400

Execution Notes

I didn’t do anything fancy for this beer and left it in the primary untouched the whole fermenting time (and a bit longer).

I did a bit more research of Witbiers and came across this post which suggests fresh orange peel.  So I added a bit of my own to the kit.

For what it's worth, Here's a quote from July/Aug 2007 BYO mag, Style profile (Witbier) by Jamil Zainasheff:

"The best way to add citrus character is with fresh citrus. The Petrified bits of orange peel often used may be authentic, but fres zest has a much brighter character. Select tangerines or oranges with a nice bold, fresh, aroma...Use a citrus zester to peel the very surface of the skin and avoid digging deep into the white pith as it is bitter and lacks citrus character. Measure the zest by weight, targeting about 1 to 2 ounces in a 5 gallon batch."

His recipe is in that article, as well. (calls for 1.5 oz of zest and .4 oz of crushed coriander.)

So I didn’t do the yeast start calculations correctly and subtracted 5 months instead of 4. This resulted with an over pitch but given that I hit my OG and FG right on everything worked out just fine.

Also, I didn’t clean out my tubing right away on brew day.   Some of the hoses look stained now.  I’m not sure if they would have been if I’d cleaned everything right away, but I think they are still usable.

Finally, my fermentation could get down to cold crashing temperatures.  At one time it was iced over so I had to let the thaw out.  This was the first time it has ever iced up and after that either something broke in the A/C unit or just I’ve never tried to cold crash when it was this warm.  Either way my fermentation chamber could only get down to ~55 degF and that was with it running almost none stop.  I really hope it didn’t break.

Schedule

  • Brew day: 3/15/2014
  • Cold Crash Start: 4/22/2014
    • Broken fermentation chamber
  • Secondary Fermentation: N/A
  • Dry Hopping: N/A
  • Cold Crash 2: N/A
  • Gelatin (32): N/A
  • Bottling Prep: 4/27/2014
    • No early prep
  • Bottling: 4/27/2014

Alcohol

  • Target Starting Gravity: 1.042
  • Starting Gravity:  1.042
  • Target Final Gravity: 1.010
  • Final Gravity: 1.009
  • Alcohol %: 4.31

Color: 15

Recommendations for next time

Use less coriander.  This beer is a bit too spicy for my tastes. Still good, but I’d tone it down a bit as suggested in the same Witbier article mentioned above

For what it's worth, Here's a quote from July/Aug 2007 BYO mag, Style profile (Witbier) by Jamil Zainasheff:

As for the coriander, he says, "I gently crush the coriander with the back of a heavy spoon to expose the inside of the seeds, which gives it a fairly strong, spicy character versus whole seeds. The level of coriander is probably the area most brewers overshoot, resulting in a really peppery beer. The desired result is a gentle background spicing not an overwhelming one. If you have fairly fresh coriander, start with .4 oz per 5 gallon batch during the last 5min of boil."

Magnum hops in a Kolsch?

homebrewtalk.com forum

I’m copying the (Black Widow Kolsch recipe, but have made some adjustments for my efficiencies and losses which puts my hops Hallertauer hops to 1.25oz (60min boil). Since the hops come in 1oz bags I’m thinking about just using 1oz of Hallertauer and then using 0.25oz of Magnum which is leftover from my last batch. Seems to look like the profile is about where I want it (brewtoad recipe), but I’m wondering if anyone has any thoughts on the taste/smell impact as I’ll know is what I’ve read from freshhops

Magnum hops in a Kolsch?

Thoughts on coleman xtreme 100qt cooler as a MLT

homebrewtalk.com forum

I’ve read that the coleman 70Qt extreme cooler was a great cooler to convert to a MLT, but wanted a little bit larger one. So I got the 100qt version online thinking it would work out the same. On receiving it I’m second guessing my plan. Take a look at these pictures. 

I’m concerned the ridges inside will create a channeling effect when batch sparging. I don’t think the 70Qt version has these. 

The other thing that seems different from the 70Qt version is the drain channel. Pictures from the 70qt version look like there is a distinctive channel (and the sticker on 100qt version looks like it does too). However, the channel appears non-existent and the bottom looks flat (though I haven’t tested to wit the is a slope or not) 

What are your thoughts about the 100qt version? Should I keep it or look for a different cooler?

Thoughts on coleman xtreme 100qt cooler as a MLT

Mash Tun

I’ve finally completed my mash tun build, the last new tool I need for all grain brewing.  For my birthday, I got a 110qt Igloo Glider Roller cooler from Costco,  a ball valve kit, and a 12″ stainless steel water heater connector.  With this I will be able to brew the highest ABV beers (all the way up to 18%) in 10 gallon batches.  Which is perfect since I recently got new kettles and burners (see my other post on that) to do 10 gallon batches too.

With my new gear I’ll had to do was take out the coolers drain and then put in my own drain.  Well 8 hours later I’ve finally finished.  Apparently my cooler is thicker than most coolers so I had to get some additional parts.  With my new parts, a female to female (f2f) extension and a male to male extension,, both stainless steel, I had a setup that was too long and I had a leak out of the hole.  So I then hand cut the f2f extension on both sides to shorten it up.  Still this leaked.  I tried several other configurations with additional washers and they all had leaks.  Then when I was in DC I stopped at a My Local Home Brew Store  and got some help from some very friendly staff and purchased several O-rings, some heat resistant some not.  Well when I got home I still could screw things together without having an ever so slight leak.  Note, the leak on the outside was slow, which is bad, but I was also worried that it was leaking into the center of the cooler, even worse.  So then Chase and I made another trip to another hardware store and picked up some more washers and another pipe wrench.  With that final trip to the store I finally got a mash tun that didn’t leak.  Hallelujah! Oh, and it turns out I never needed to cut through any of the f2f extension, but it works just fine short too.

One final note, most coolers advertised size includes the lid and seems to not always add up correctly.  This cooler, Igloo Glide Roller Premium, is advertised as a 110qt cooler.  When you measure up to where the lid hits 13.5″ (which is needed to keep the heat in while mashing) and take out the bump in the inside this cooler ends up being about a 96qt cooler.  Still plenty big for 10G batches, but something to be mindful when selecting a cooler.

Mash Paddle

I created my mash paddle with some help from my father-in-law, Bob, to get me upgraded for all grain brewing. Bob gave me a very nice piece of Lenga (aka fireland cherry) wood from Chile to make the paddle out of. We were able to quickly cut out a paddle shape and drill out some holes one afternoon. Then in another afternoon I used a dremel and rounded out all the edges. Followed by some good old hand sanding with 60 and 200 grit sand paper. It isn’t the fanciest of paddles, but should work out for be great. Now I just need to get the MLT to stop leaking and I’ll be ready for my first batch of all grain brewing.