I just got a new phone.  After working really hard on my Evo shift I just couldn’t take the slowness anymore.  So I upgraded to a huge phone, the Samsung Note 2 on Sprint.  I’m still not too sure this is the phone for me as I’m worried about the size of it.  I almost bought the phone from Best Buy, but they were out of the titanium version and would have to mail it in.  So I decided to get it through Costco.  From Costco they had it as the same price, but covered the $36 upgrade fee and gave an additional car charger, case, and screen protector.  The phone was also mailed and it took about a week for it to come in.  Once I got the phone I charged the battery to full then went to work transferring phones over.

Samsung Note 2

Prepare for Transfer

In order to do an easy transfer from my old phone I did a Titanium backup of my apps. More specifically:

  1. Go into the Titanium Backup * root app
  2. Select Menu -> Batch actions ->Backup all user apps + system data

This should backup all the SMS messages too, but just in case it didn’t work is used SMS Backup & Restore

Rooting

I have the root version and really want to keep root on my phone.  Though at this time I have no desire to flash any ROMs or add a different recovery, but still want to get the OTA updates from Sprint/Samsung.  So I followed the directions posted on the XDA forums.  At the time of writing this post the VPALJC was the most current ROM.  I’ve copied the steps I followed, pretty much exactly as listed on the forum, so that I can recall what I did in the past.  I suggest reading the forum as it has a better chance of being kept up to date, whereas this post will be a simple moment in time.

Steps I followed to root and still maintain OTA updates.

  1. From your computer do the following
    1. Download Odin
    2. Unzip Odin
    3. Download the SPH-L900 (Samsung note 2) drivers from the Samsung’s site. Click on the Manuals & Downloads tab at the bottom and then on Software for the latest driver.
    4. Move the driver exe to the ODIN folder
    5. Download the mrRobinson‘s version of the firmware, VPALJC, from root66_SPR_L900VPALJC.7z
    6. Unzip the file and place into the ODIN folder
  2. From the phone
    1. Put the phone into download mode.
      1. Turn it off
      2. Then hold vol. down + home + power
      3. Choose accept to go into download mode
  3. From the computer
    1. Start the ODIN program
    2. Then in the PDA field and select the firmware file, root66_SPR_L900VPALJ1.tar.md5
    3. Leave Auto Reboot and F. Reset Time checked.
    4. Click start and wait for it to download the files to the phone, below is the message log I saw
    Enter CS for MD5..
    Check MD5.. Do not unplug the cable..
    Please wait..
    root66_SPR_L900VPALJC.tar.md5 is valid.
    Checking MD5 finished Sucessfully..
    Leave CS..All threads completed. (succeed 0 / failed 0)
    Added!!
    ID:0/003> Odin v.3 engine (ID:3)..
    File analysis..
    SetupConnection..
    Initialzation..
    Get PIT for mapping..
    Firmware update start..
    boot.img
    NAND Write Start!!
    cache.img
    hidden.img
    modem.bin
    param.bin
    recovery.img
    sboot.bin
    system.img
    tombstones.img
    tz.img
    RQT_CLOSE !!
    RES OK !!
    Removed!!
    Remain Port ....  0
    All threads completed. (succeed 1 / failed 0)
  4. When done let phone reboot and the phone is rooted
  5. I haven’t used or tested this yet to retain root privileges through an OTA update
    1. ,Get OTA Rootkeeper from the Google Play store on your phone
    2. Open OTA Rootkeeper and click “Protect Root”
    3. Then after you receive a notification for an OTA update you should go into OTA Rootkeeper and click something to re-enable root.
      1. Since I haven’t had to use this yet I don’t know what I will have to click nor do I know that this will work as the notes in the app say “Useless with: Samsung phones updated with KIES or Odin and older devices using YAFFS filesystems only, and device flashing entiere system partition”
      2. I suppose I’ll cross this road when I get to it.

Well after things rooted successful the phone restarted and everything worked just fine and root was enabled.

Transferring Apps & Data

Well with things rooted I just needed to get the apps back through Titanium backup.

  1. Move the SD card to the new phone
  2. Download the Titanium Backup * root app
  3. In Titatnium backup do the following:
    1. Make sure the backup folder points to the folder that all the backups were stored in as the phone may not default to the same folder.  Go to Menu -> Preferences -> Backup Folder Location
    2. Next restore the apps with Menu -> Batch Actions -> Restore missing apps + all system data
      1. Becareful to only select the system data that will work with the new phone (SMS, call logs, contacts, etc) especially when switching brands.  I don’t know what will happen, but I’m sure it isn’t good
    3. Next ensure all the apps are link to the Play Store with Menu -> Market Doctor

And once that is done things should be back where they are with the exception that I see that the defaults and some passwords didn’t transfer.  I may unselected some system data that I wasn’t supposed to, but selecting the default apps in some cases isn’t so bad.

Closing Thoughts

Well with all that done, I’m nearly back up and running on my new phone.  I’m switching back to Launcher Pro, but I really like a the Touchwiz calendar widget.  I’ll be searching around the net to see if I can find a way to port it over or if there is an equivalent app.  I was using calendar pad, but I really like the Touchwiz widget.


Tags: , , , , , , , ,

Our entertainment center only has a small air vent in the back when the front glass doors are closed that causes everything inside to get pretty warm. So I decided I’d create a small little circuit to turn on some fans when it gets too hot inside.

Well I started out by doing several Google searches to see if there were any projects already out there that I could just copy. I did find a couple projects (1 and 2) that were close to what I wanted, but not quite. In both of these the fan speed was proportional to the temperature whereas I only want an on/off function at the desired temperature. However, both of these started me down the initial path for my design.  I broke out my old circuit books from college and tried a few different ideas.  After a bit of work using an Op-amp before the first transistor was just the right thing for this function.

Schematics

It has been a very long time since I’ve done any real circuit design. At work I frequently review schematics to understand how things work, but leave the fine details and analysis to our electronic design team. So the first step was to simulate the circuit using Proteus. I had not used this software before, but it seemed somewhat intuitive to use. I think there are many issues with the simulation of the active parts, but I was able to work around these issues to get things going. I also think that their could be a lot of work on the usability of the program to make it more natural to use.

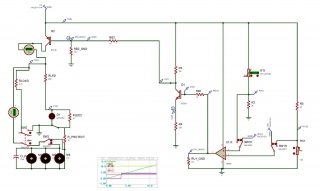
Temperature Fan Circuit

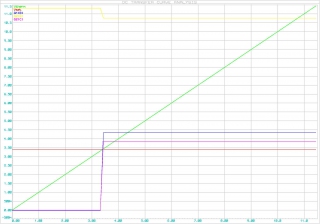
This is a graph of the simulation. What it shows is right at the Vset voltage (the voltage that I want to turn the fan on) the comparator goes from low to high and then the Q2(C) goes from 0V to about 3.6V. In reality after testing this circuit the voltage at Q2(C) is the about 12V. I couldn’t figure out why Proteus was modeling this wrong, but it works so I’m happy.

Power Supply Circuit

Once I had the main circuit working I started to add the power supply into the design. My simple power supply is to give me a 12V ~1A drive. I had bought all the part to support up to 1.5A, but after seeing the size of the transformers I settled on a 1A transformer. In both the sim and on the bread board I was seeing my 12V supply voltage drop way down. I wrote a quick post about it which is really a link to the Electronics Point forum. So that this blog post is complete I’ve cut, pasted, and modified select posts from the forum below.

Problem Statement:

I have a L7812 setup to give my circuit a 12V DC power. The L7812 has bridge rectifier, caps, and transformer 120V to 15V. From the LM7812 I pass the current through a pnp transistor that is fully saturated. Looks like I get about 18-19V into the L7812 and when the motors (small pc fan motors) are off (pnp open) I see a stable ~12V.

I have a small resistor in series (out of motors to ground) with the motors (3 in parallel) to limit the current. The motors are expected to draw 100mA. So I expect to drop a bit over 300mA across the circuit. My transformer and L7812 are all spec for up to 1A. When I turn the motors on (pnp saturated) the voltage sags to near 9V pulling about 300mA. So I’m not too sure why I’m seeing the sag as I should be able to drive plenty of current and with my resistor in series of the current path there should be current limited.

Any ideas? Thank you.

Issues:

(Harald Kapp) C2 is far too small. A rule of thumb is 1000µF per 1A of current, so instead of 33µF you should have at least 330µF at 300mA. I suggest 1000µF. If you measure the input voltage of the 7812 with an oscilloscope you will see lots of ripple with your current setup.

Resolution

Just added the 1000uF on the input and the voltage sag is gone.

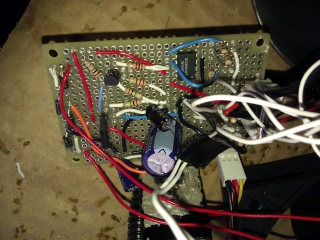
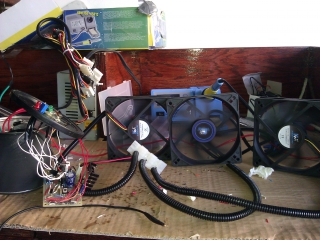
With the power problem fixed my circuit worked! Now it was time to transfer my prototype to a PCB board. Soldering everything together went rather smoothly. The hardest part was holding the circuit and soldering at the same time. For all of my college projects we pretty much always did this work in a two person team which made things much easier and faster. As for packaging, I used an old wasabi peanut container, spray painted it black, and made cuts where I needed them. Not too fancy but it looks okay when sitting in the entertainment center. The fans used are basic PC fans. My circuit is designed to support 1A so I needed to be somewhat careful of which fans I bought. Tom helped me

After all the help here is the final (really simple) circuit.

Prototyping

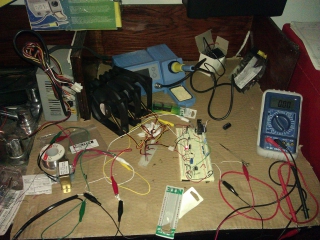
As I mentioned the active parts didn’t simulate too well. So once I got something working close to what I wanted I placed the circuit on a bread board to see if it was functional. After some testing I then went back to the simulation and repeated this cycle several times. In my prototyping stages I used an old pc power supply for the 12V into my circuit. This worked out pretty well other than it ended up being another mini-project just to get the power supply working again.

Here is a quick picture of my test bench.

Assembly & Test

After the prototype checked out against the simulations (or verified where the sim was incorrect) it was time to wire it all up.  I remember now why in college we always worked in twos when soldering; it is really hard to solder by yourself, holding the solder, the board, and the soldering iron is tough with two hands and without a good holder.

As I placed parts I periodically did checks to make sure I didn’t short anything out unexpectedly. Also, I planned for the external inputs to be along the edges which worked out pretty well, but I neglected to set up the power rails in a very good place which in my opinion makes the circuit look a bit ugly. (Yes, I’m an engineer and circuits can be pretty and ugly).


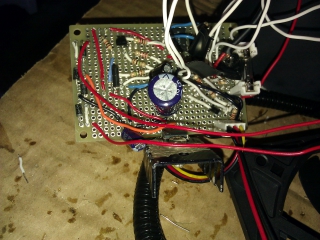
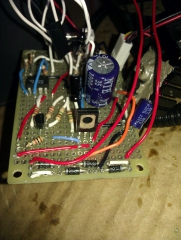
A few angles of the board

angle #2

angle #3

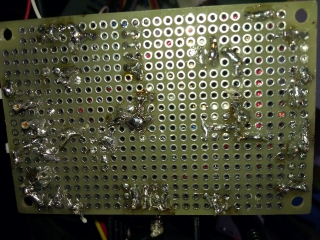
The bottom of the board

Once it was all put together I made a several measurements of how the circuit was working, but I seem to have lost them. Well, at any rate, the circuit was working as I expected.

Final Integration

Here are the final integration pictures, right before things are all buttoned up


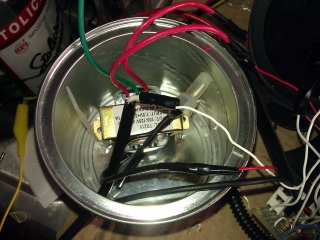
Looking inside the canister with the AC-AC converter. I ended up zip tying it down to the bottom which worked out really well. (which is kind of funny if you know about our latest Jeep incident where the techs broke something and used a zip tie to fix it).


Everything plugged in and working before I close up the lid


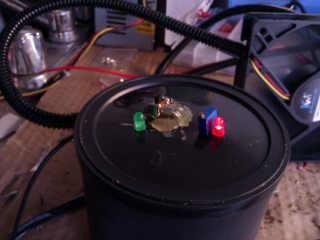
Top of the Lid

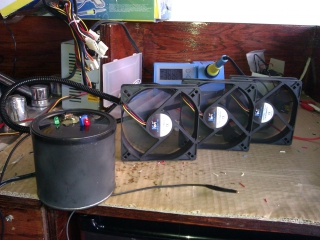
Final Product

There are two final product images.  The first is from the garage.

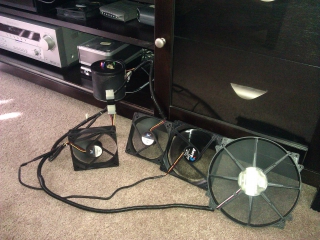
I did some testing inside my entertainment center and decided I needed more powerful fans to move the air.  So this second image is in from of the entertainment center with more powerful fans attached.

Final Thoughts

As a last second addition I placed a green LED to indicate if it was on or off. With all the fans in place it seems to work pretty well except for when the playstation is going. The PS3 just generates too much heat for me get out through just the back. So for now when I use the PS3 I still open up the doors. All in all, this worked out pretty well and is step 1 in baby proofing the entertainment center. Step 2 will be to lock the sliding doors and drawer, but that is a project for another day.

I’m happy I was able to make a circuit after not doing anything like this in a really long time and I had fun doing it. Perhaps I slightly earned my EE license for the year. It took way way longer than I expected which Lisa didn’t care for my late nights much. I think the cost of this thing was about $40, but I bought a lot of spare parts for future projects and really don’t know what the exact cost was.

Here is a zip file of the PDF and design files if anyone is looking for them
Temperature-Controlled-Fan-Final-Design.zip

Dilbert comic

Tags: , , , ,

This is a follow up to setting up my Dell M1730 laptop up with Ubuntu post as I configure it to be a decent media server.

VNC

The keyboard on the laptop is broken. I had to buy a cheap USB keyboard so that I could get the installation done. Now that it is installed I plan to just VNC into the computer to do everything (or SSH when command line execution is sufficient).

Since Vino comes with Ubuntu I went with that. It defaults to port 5900 and I wanted to change it to use the alternative port using dconf-editor as noted here. Also it is REALLY slow and after a bit of reading I found that checking the ‘ disable_xdamage ‘ option fixed things. I’ve read that this isn’t the most bandwidth efficient way to do things, but I’m happy with the result for now.

(Update: 12/14/2014)  I’ve upgraded to the next version of Ubunut (v???) and it wiped out my VNC settings. So instead of vino this time I used x11vnc.  In just a few minutes of using it, x11vnc appears to be much much more response.  I’m not sure x11vnc is going to keep the settings after a reboot, but for this boot I’m much happier with my VNCing experience


SSH

This was pretty easy to setup. I already forgot what I did here, but never-the-less it works using Putty from my windows laptop.

I was just reading about exporting displays using Xming, X-win32, or Exceed and may give that a try some other time.

Wake up on LAN (WOL)

My ethernet card supports WOL and it is easily enabled in the Power Settings. Note, the wake up only works if Ubuntu is in standby mode and not fully shutdown.

I also configured my dd-wrt router in the Administration->WOL section to enable the WOL for this computer.   Now when I put the computer into Suspend (not shutdown) I can go into the DD-WRT webpage and through the WOL section click the “Wake Up” button. The webpage shows the following (actual MAC address replaced with XXs) and the computer wakes up

Waking up XX:XX:XX:XX:XX:XX with 192.168.1.255:7...

The next thing that I wanted to setup is to be able to wake up this computer from an external IP. Right now the only way I can click the “Wake Up” button is to be on the internal LAN and I’ve blocked public access to this page. After tinkering around for a day I’ve discovered there isn’t any simple thing out there that I’m looking for. What I really want to be able to do is from any computer (i.e. no special software) turn on the media server. Since there isn’t anything good out there right now I’m going to take this up as a new project and will post about this whenever it is working.


SAMBA

I setup SAMBA to get to the drives over the network on my windows laptop. This is a good guide http://www.noobslab.com/2012/03/configure-samba-sharing-between-ubuntu.html. I setup access a bit different for my own network, but this helped a lot.


XMBC

I’ve relocated my laptop along with an external drive so that it is connected directly to the LAN.  With XMBC I plan to watch many of my movies through the PS3 since this is the normal way that we watch bluerays too.  For this I’m more interested in stability than the latest and greatest so and the setup is pretty easy once you get to the right link in XMBC.


sudo apt-get install python-software-properties pkg-config
sudo add-apt-repository ppa:team-xbmc
sudo apt-get update
sudo apt-get install xbmc

Then I learned this really isn’t a DLNA server and isn’t what I need.  I have it working, but I’d really like to play my videos through the PS3.


PS3 Media Server

I use PS3 Media Server on my windows machine and it works great so I set out to use this on Ubuntu. Here is my starting point: https://help.ubuntu.com/community/Ps3MediaServer. I did a manual install to get 1.72 since in 1.71 ,the ppa version, there is a bug. After I got it loaded I tested it on a few videos. MKVs seemed to work, but some some AVI files (like my Lord of the Rings) did not have audio. Other AVI files worked and I wasn’t too sure what the difference was between the working and non-working files. So I decided to look for another option.

Mediatomb

There was a lot of talk about Mediatomb, so I installed that. But after opening things up it looks confusing and I wasn’t really interested in figuring this out (though I’m sure it is pretty good).

Universal Media Server (UMS)

So onto option C, Universal Media Server (UMS). UMS is just a branch off of PS3 Media Server which is nice since I’m already familiar with it. I got the tarball from http://www.universalmediaserver.com/ and extracted it to /usr/sbin with the ums-2.2.0 default folder. I noticed that there was a error about mediainfo so I did an install

sudo apt-get install mediainfo

With it open on the default setting I did a few tests and all the files worked including the all important Lord of the Rings videos. I then made a few slight changes to the defaults, but am really happy that this work right out of the box, so to speak. I set UMS to start minimized, force the network to use eth0 rather than the wireless card, set the max bandwidth to 0, and added the movieinfo plugin.

With that my media server if pretty close to being in working order. I’ve discovered that there is an issue with the DVI output that looks like will take some time to get it working or perhaps will never work. But that is another post.

Tags: , , , , , , , , , , , , ,

Well shortly after posting about how I got my router loaded with DD-WRT and had all my USB drives working I discovered that my USB drives were no longer working.

After poking around a bit I found there were errors generated when the automount script was executing. In particular I was seeing:

root@BLT_ROUTER:/opt/etc# service automount status
cannot touch `/opt/etc/nomount': Input/output error
S35automount: Create /opt/etc/automount
cannot touch `/opt/etc/automount': Input/output error
I can not write /opt/etc/automount, abort

When I went to the directory I saw the following (most files removed to keep the list short)

root@BLT_ROUTER:/tmp# ls -al /opt/etc
total 1608
drwxr-xr-x 16 root root    4096 Dec 12 18:20 .
drwxr-xr-x 23 root root    4096 Nov 15 08:15 ..
drwxr-xr-x  3 root root    4096 May  5  2011 asterisk
??????????  ? ?    ?          ?            ? automount
...
??????????  ? ?    ?          ?            ? nomount
-rw-r--r--  1 root root   35782 May  5  2011 nzbget.conf
-rw-r--r--  1 root root     104 May  5  2011 p910nd
drwxr-xr-x  2 root root    4096 Feb 23  2012 php.d

A quick search found this forum post where it was suggested to Stop automount (service automount stop) and then delete the two files.

This worked to delete the files, but when I rebooted the router only the /opt share came up. I messed around with this for quite a while and realized that something wasn’t right with the USB drives. So I disconnected them from the router and rebooted the router. Next I unplugged the USB drives power cord (where I noticed that one of the drives was unplugged, probably from when I was adding setting up my media server). After a short while I plugged in the drives power cord and the USB cable back into the router.

After another reboot the automount script came up correctly, however it lost my custom mounting assignments. So I edited the /opt/etc/automount file in the same manner that I posted earlier. Next I did restarted the automount and samba services

service automount stop
service automount start
service samba stop
service samba start

Finally, I’m backup and running.

Tags: , ,

Here is a recap of an old project. following this straight through won’t be enough to redo what I’ve done, but the websites and hints that I followed are linked throughout this post.

I bought a Belkin PlayMax 600HD router from Best Buy because I read in some review that I could do port forwarding (needed to setup my own server at home).  Well after a lot of time in the settings and several emails to Belkin it turns out that this feature isn’t built in.  So after a friend told me about dd-wrt I decided to give it a shot after reading a lot of forums to see if my router would work.  This forum post on dd-wrt.com is about my router.

For the most part I followed the instructions from teh dd-wrt site: http://www.dd-wrt.com/wiki/index.php/Installation

Start by doing a 30/30/30 reset. The text below is copied from the dd-wrt website.

Hard Reset (aka 30/30/30 reset):

The following procedure will clear out the NVRAM and set dd-wrt back to default values:

  • With the unit powered on, press and hold the reset button on back of unit for 30 seconds
  • Without releasing the reset button, unplug the unit and hold reset for another 30 seconds
  • Plug the unit back in STILL holding the reset button a final 30 seconds (please note that this step can put Asus devices into recovery mode…see note below!)

This procedure should be done BEFORE and AFTER every firmware upgrade/downgrade.

Do not use configuration restore if you change firmware builds (different svn build numbers).

I got my files from ftp://ftp.dd-wrt.com/others/eko/V24-K26/

  • dd-wrt.v24-15508_NEWD-2_K2.6_mini.bin
  • dd-wrt.v24-18946_NEWD-2_K2.6_mega.bin

My Router is advised to only use the TFTP: http://www.dd-wrt.com/wiki/index.php/TFTP_flash

First I flashed the 15508 mini and then a 30/30/30 reset.  Even though I’m advised to use TFTP I used the webpage GUI  to flash the 18946 mega and followed up with a 30/30/30 reset.  I’ve found that Firefox has issues with webpage GUI and have reverted to Internet Explorer for all setting changes and flash updates.   I actually tried several different version and sizes for my router and sometimes had issues with enabling SSH or other weird things.  I even had a problem with the 18946 mega for a while, but after a lot of time trying different things I believe that I simply didn’t get a good flash from either not doing a 30/30/30 reset properly or something else.  But in the end the 18946 mega works for me.

In the system settings I now see:

Router Name: BLT_ROUTER
Router Model: Belkin F7D4301 / F7D8301 v1
Firmware Version: DD-WRT v24-sp2 (04/07/12) mega – build 18946M NEWD-2 K2.6 Eko

There is a ton of configuring to do that I’m not going to get into because I either don’t remember what I set or I’m concerned about leaking potential security details.  Things that I’ve added are Wake up on Lan (WOL) for my media server, SSH is a must to get into the file system from within the network, port forwarding (see below) and sharing the two USB drive connections over the network (see below)

Port Forwarding

I had a heck of a time getting port forwarding to work for computers within the LAN.  Here is a post I placed on the dd-wrt forum about this topic:


Here are several websites that I referenced read and found useful along the way

In the end I added the following to the firewall section in the Administration->Commands section

insmod ipt_mark
insmod xt_mark
iptables -t mangle -A PREROUTING -i ! `get_wanface` -d `nvram get wan_ipaddr` -j MARK --set-mark 0xd001
iptables -t mangle -A PREROUTING -j CONNMARK --save-mark
iptables -t nat -A POSTROUTING -m mark --mark 0xd001 -j MASQUERADE

I’ll have to say I’m not entire sure I understand what is happening, but it works so I’m not complaining.  Now I’m able to see this website both internal and external to my network.

NAS USB Drives

I have two 1TB USB drives attached to my router the following are the steps that I took which mostly comes from following this sites instructions which also uses the dd-wrt sites instructions of Optware, the Right Way.


Format the hard drives
(I did this at another time and didn’t record my steps)
Enable USB at Services->USB
and enable the following parameters:
Core USB Support
USB Storage Support
Automatic Drive Mount
Disk Mount Option = /opt

Save then do a reboot

Check Services->USB to see the Optware and Swap loaded

Disk Info
--- /dev/discs/disc0/disc 
Block device, size 931.5 GiB (1000204886016 bytes) 
DOS/MBR partition map 
Partition 1: 930.5 GiB (999128297984 bytes, 1951422457 sectors from 2055) 
Type 0x07 (HPFS/NTFS) 
NTFS file system 
Volume size 930.5 GiB (999128297472 bytes, 1951422456 sectors) 
Partition 2: 1 GiB (1073741824 bytes, 2097152 sectors from 1951424512) 
Type 0x0F (Win95 Ext'd (LBA)) 
Partition 5: 767 MiB (804257792 bytes, 1570816 sectors from 1951424512+2048) 
Type 0x83 (Linux) 
Ext2 file system 
Volume name "/Optware" 
UUID 0A911958-F81C-51AA-E421-3C2F22FBB048 (Reserved) 
Volume size 767 MiB (804257792 bytes, 196352 blocks of 4 KiB) 
Partition 6: 255 MiB (267386880 bytes, 522240 sectors from 1952997376+2048) 
Type 0x82 (Linux swap / Solaris) 
Linux swap, version 2, subversion 1, 4 KiB pages, little-endian 
Swap size 255.0 MiB (267378688 bytes, 65278 pages of 4 KiB) 
Status: Mounted on /opt 
Status: Not mounted 
Status: Not mounted 
Status: Not mounted

Next SSH into the router and verify the /opt partition is mounted

root@BLT_ROUTER:~# mount

rootfs on / type rootfs (rw)
/dev/root on / type squashfs (ro)
none on /dev type devfs (rw)
proc on /proc type proc (rw)
sysfs on /sys type sysfs (rw)
ramfs on /tmp type ramfs (rw)
devpts on /dev/pts type devpts (rw)
devpts on /proc/bus/usb type usbfs (rw)
/dev/discs/disc0/part5 on /opt type ext2 (rw,noatime)

Check for router connection to the internet

root@BLT_ROUTER:~# ping google.com

PING google.com (74.125.239.7): 56 data bytes
64 bytes from 74.125.239.7: icmp_seq=0 ttl=55 time=17.870 ms
64 bytes from 74.125.239.7: icmp_seq=1 ttl=55 time=17.222 ms
--- google.com ping statistics ---
2 packets transmitted, 2 packets received, 0% packet loss
round-trip min/avg/max/stddev = 17.222/17.546/17.870/0.324 ms

Next download the optware prep script

root@BLT_ROUTER:~# wget -O /tmp/prep_optware http://wd.mirmana.com/prep_optware

--2012-11-11 21:53:33--  http://wd.mirmana.com/prep_optware
Resolving wd.mirmana.com... 212.123.145.69
Connecting to wd.mirmana.com|212.123.145.69|:80... connected.
HTTP request sent, awaiting response... 200 OK
Length: 25381 (25K) [application/octet-stream]
Saving to: `/tmp/prep_optware'

100%[========================================================================================================================================>] 25,381      48.4K/s   in 0.5s

2012-11-11 21:53:34 (48.4 KB/s) - `/tmp/prep_optware' saved [25381/25381]

Now run the prep optware script. I choose Y for all questions

root@BLT_ROUTER:~# sh /tmp/prep_optware

Then I did a reboot

root@BLT_ROUTER:~# reboot

Check free space on optware partition

root@BLT_ROUTER:~# df -h
Filesystem            Size  Used Avail Use% Mounted on
rootfs                6.3M  6.3M     0 100% /
/dev/root             6.3M  6.3M     0 100% /
/dev/discs/disc0/part5 755M 360M 359M 51% /opt

Now install Samba 3.5 (or anything greater than Samba 2) so that it works on Windows 7. I followed this for the most part

First, create backups of original files

root@BLT_ROUTER:/opt/etc/samba#    cp /opt/etc/samba/smb.conf /opt/etc/samba/smb.conf.copy
root@BLT_ROUTER:/opt/etc/samba#  cp /opt/etc/init.d/S80samba /opt/etc/init.d/S80samba.copy

Then turn off the existing Samba service

service samba stop
service samba off

and then install Samba (I added Samba 3.5

ipkg-opt remove samba2 
ipkg-opt install samba35
ipkg-opt install samba35-swat

After doing this I saw an error:
After removing file and starting noticed and error

grep: can't load library 'libpcre.so.1'

I simply ran updates/upgrades to fix the problem

Update OTWR
ipkg update
ipkg upgrade

Other in some forums had posted the following symbolic link fix, but my update above seemed to do the trick:

	
ln -s /opt/lib/libpcre.so.1 /opt/lib/libpcre.so.0

With Samba 3.5 now isntalled it is time to get it configured for the USB drives. First check partitions to determine which name to setup the mounts to.

root@BLT_ROUTER:~# more /proc/partitions
major minor  #blocks  name

  31     0        192 mtdblock0
  31     1       7936 mtdblock1
  31     2       6405 mtdblock2
  31     3         64 mtdblock3
  31     4        128 mtdblock4
   8     0  976762584 sda
 8 1 975711228 sda1
   8     2          1 sda2
   8     5     785408 sda5
   8     6     261120 sda6
   8    16  976762584 sdb
  8 17 975699964 sdb1
   8    18          1 sdb2
   8    21     921600 sdb5
   8    22     136192 sdb6

SDA1 and SDB1 are my external 1TB USB drives. Plug in each one one at a time to determine which block size belongs to which harddrive. The following is just another view of the above.

root@BLT_ROUTER:/mnt# fdisk -l

Disk /dev/sda: 1000.2 GB, 1000204886016 bytes
255 heads, 63 sectors/track, 121601 cylinders
Units = cylinders of 16065 * 512 = 8225280 bytes
Disk identifier: 0x4d0b4b49

   Device Boot      Start         End      Blocks   Id  System
/dev/sda1               1      121471   975711228+   7  HPFS/NTFS
Partition 1 does not end on cylinder boundary.
/dev/sda2          121471      121602     1048576    f  W95 Ext'd (LBA)
Partition 2 does not end on cylinder boundary.
/dev/sda5          121471      121569      785408   83  Linux
/dev/sda6          121569      121602      261120   82  Linux swap / Solaris

Disk /dev/sdb: 1000.2 GB, 1000204886016 bytes
255 heads, 63 sectors/track, 121601 cylinders
Units = cylinders of 16065 * 512 = 8225280 bytes
Disk identifier: 0x11c21da9

   Device Boot      Start         End      Blocks   Id  System
/dev/sdb1               1      121470   975699964+   7  HPFS/NTFS
Partition 1 does not end on cylinder boundary.
/dev/sdb2          121470      121602     1059840    f  W95 Ext'd (LBA)
Partition 2 does not end on cylinder boundary.
/dev/sdb5          121470      121585      921600   83  Linux
/dev/sdb6          121585      121602      136192   82  Linux swap / Solaris
root@BLT_ROUTER:/tmp# blkid
/dev/sda1: UUID="D4DC4E64DC4E414A" LABEL="1TB ExtnDrive" TYPE="ntfs"
/dev/sda5: LABEL="/Optware" UUID="0a911958-f81c-51aa-e421-3c2f22fbb048" TYPE="ext2"
/dev/sda6: LABEL="Swap" UUID="5d705f77-397f-868e-cf52-545be358059c" TYPE="swap"
/dev/sdb1: UUID="FC0C24480C23FBF0" LABEL="BackupDrive" TYPE="ntfs"
/dev/sdb5: LABEL="Optware" UUID="9515a4ae-351b-f102-a517-a196dcb45fa8" TYPE="ext2"
/dev/sdb6: LABEL="Swap" UUID="1bb9e834-1bf9-d98b-0a1f-d8bac631f5c5" TYPE="swap"

Next, edit /opt/etc/automount to set the USB drives mount point to the desired location, as I didn’t care for the default too much. Leave /opt as is. I changed my USB drive partitions to /tmp/mnt and /tmp/mnt2

root@BLT_ROUTER:/opt/etc# more automount
/opt 0a911958-f81c-51aa-e421-3c2f22fbb048 ext2
/tmp/mnt D4DC4E64DC4E414A fuseblk
/tmp/mnt2 FC0C24480C23FBF0 fuseblk
/tmp/d 9515a4ae-351b-f102-a517-a196dcb45fa8 ext2

Next configure the samba configuration files to include the USB drives.  Make sure the workgroup is the same as your windows computers (default is WORKGROUP)

I changed the hosts allow and interfaces lines, though I don’t recall why now

hosts allow = 192.168.0.0/16 10.0.0.0/8 172.16.0.0/12 127.0.0.0/8
interfaces = 192.168.1.1/24 192.168.1.1/255.255.255.0

Enable WINS Support

wins support = yes

Then in the share definitions section I added the text below to assign the Windows share name to the desired path. All the other default shares are commented out.

[BackupDrive]
path = /mnt
valid users = www-data nobody root
public = yes
guest ok = yes
;BT
read only = no
;
writable = yes
printable = no
force user = root
create mask = 0765

[1TBDrive]
path = /tmp/mnt2
valid users = www-data nobody root
public = yes
guest = ok
read only = no
writable = yes
printable = no
force user = root
create mask = 0765

[homes]
   valid users = %S
   read only = no
   browseable = no

[Optware]
path =/opt
force user = root
read only = no
guest ok = yes

Save the config file and restart Samba

service samba stop

Everything should be up and going.

Tags: , , , , , ,

« Older entries § Newer entries »